| |
| |
Mastering
3D Studio MAX R3 |
Camera Tools
To see the different tools that the Camera viewport offers, we must place
a camera in your scene.
- 1. First, reset your scene the way it was before
all that playing around with the Standard tools. Select Edit Ø
Fetch and choose Yes when prompted.
- 2. Now place a camera in your scene. Go to the Command
Panel Ø Create tab Ø
Cameras and choose Target.
- 3. In the front viewport, click in the upper-right
corner, drag down to middle of the viewport, and let go of the mouse
button to place the camera.
- 4. Right-click in the user viewport to activate
it and press C. You are now viewing this scene from the viewpoint of
your camera.
The camera you just created is called a target camera. It is made
up of two parts: a camera, which is the position of the viewer,
and the target, the position at which the viewer is looking.
|
|
|

| TIP It is sometimes
easier to see the effects of the Camera navigation tools by comparing
the views in different viewports.
|
Using the camera you just created and referring to Figure 3.15, let’s
go through the navigation tools, described in Table 3.14. Again, Zoom
Extents All and toggling Min/Max view work the same here as in the Standard
tools.
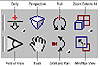
FIGURE
3.15 The Camera viewport icons
Table 3.14: CAMERA
NAVIGATION TOOLS
| Tool
| Description
|
| Dolly, Dolly Target, and
| Each of these commands moves
a camera along its line of sight. Each flyout works on a different
area of the camera. Dolly will move both the target and the camera;
Dolly Target will only move the target; and Dolly Camera will only
move the camera.
|
| Perspective
| A combination of the Dolly
and Field of View (see below) commands. Perspective increases the
amount of perspective flare or the width of your view.
|
| Roll
| Rotates the camera about its
horizontal plane. For best results with this, drag your mouse left
to right, not up and down.
|
| Field of View (FOV)
| Adjusts the amount of scene
that is visible by increasing or decreasing the angle of your view.
Increasing the FOV will cause you to see more of your scene.
|
| Truck Camera
| Moves the camera and its target
parallel to the viewport.
|
| Orbit and Pan Camera
| Orbit allows you to rotate
the camera around the target point. Pan lets you rotate the target
around the camera.
|
Light Tools
The Light viewport controls can be used with all the different light
types except the Omni type.
|
|
|

| NOTE See Chapter
10 for more information on lighting and lights.
|
Again, in order to try out some of the commands, we will set up a light
source in your scene.
- 1. Reset your scene (File Ø
Reset).
- 2. Go to Command Panel Ø
Geometry Ø Lights Ø
Target Spot.
- 3. In the front viewport, drag out a light from
the top-right corner to the middle of the viewport.
- 4. Right-click in the user viewport and press Shift+4;
this will switch to the Light viewport.
|
|
|
|
| NOTE You can
also change the viewports by right-clicking the name of a viewport
and selecting Views.
|
Now that we have a light set up in our viewport, let’s take a look
at each tool in Table 3.15. (Remember, Zoom Extents All and toggling Min/Max
view work the same here as in the Standard tools.) Your navigation tools
should look like Figure 3.16.
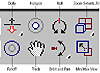
FIGURE
3.16 The Light viewport icons
| Table 3.15: LIGHT
NAVIGATION TOOLS
|
| Tool
| Description
|
| Dolly Light, Dolly Target,
| These features are the same
as the Dolly features for cameras.
|
| Hotspot
| Adjusts the light’s hotspot
cone to become narrower or wider. The Hotspot is the area of bright,
even intensity of the light.
|
| Roll Light
| Rotates the light about its
own axis
|
| Falloff
| Adjusts the light’s Falloff
cone to become narrower or wider. Falloff is the gradual transition
from the bright area of the light into the area where there is no
light at all.
|
| Truck Light
| Moves the light and the target
parallel to the view plane
|
| Orbit and Pan Light
| Orbit allows you to rotate
the light around the target point. Pan lets you rotate the target
around the light.
|
© 2000, Frol (selection,
edition, publication)
|
|
)
)
)
)