| |
| |
Mastering
3D Studio MAX R3 |
Table 9.2: RAYTRACE EXTENDED PARAMETERS
| Extra Lighting
| Adds extra light and color to a surface
evenly, respecting the direction of surface normals
|
| Translucency
| Scatters extra light and color on a surface
randomly, disregarding of the direction of surface normals; allows
shadows cast on the back of the surface to show through.
|
| Fluorescence
| Adds or subtracts color from a surface;
lights the surface with white light, overriding the current lights
in the scene.
|
| Fluorescence Bias
| Determines how much fluorescent color
is added or subtracted from the surface
|
| Transparency Environment
| Adds an environment map to a transparent
surface to appear as a refracted image
|
| Color Density
| Increases the saturation of a transparent
surface based on its thickness (similar to tinting colored glass)
|
| Fog Density
| Adds opaque color to a transparent surface
based on its thickness
|
| Reflections Type
| Allows you to choose whether reflections
will be layered with the diffuse color. By default, reflections obscure
the diffuse color as they grow stronger. The Additive setting causes
the diffuse color to always appear underneath.
|
|
|
|

| TIP You can
use the Extra Light setting to simulate radiosity (the effect of light
reflected from one surface coloring another). Just set the color swatch
to match the color of a nearby object.
|
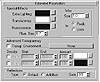
FIGURE
9.4 Extended Parameters for the Raytrace material
provide advanced surface controls for lighting, reflection, and translucency.
|
|
|
|
| TIP Fluorescence
shifts the surface color toward a color you select and then illuminates
it with white light. Setting the Fluorescence Bias parameter to 1.0
and using a fully saturated color results in an intense, “black
light” effect.
|
Creating a Translucent Surface
In nature, translucent objects partially transmit light, creating an
opaque or semi-transparent surface that displays contrasts of light and
shadow. In MAX, translucent objects (like the one in Figure 9.5) simply
receive shadows from the back of a surface and project them onto the front.
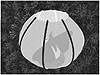
FIGURE
9.5 A translucent lamp with a moth casting shadows
through its wall
To create a translucent surface:
- 1. Create a open object, such as a plane, a vase,
or a lamp shade.
- 2. Set up an object and a light so that the new
object casts a shadow on the inside or back of the open object.
- 3. Create a 2-Sided Raytrace material.
- 4. In the Raytrace Basic Parameters rollout, set
the Transparency to about 35.
- 5. In the Raytrace Extended Parameters rollout,
set the Translucency swatch to light gray.
- 6. Assign the Raytrace material to the open object.
- 7. Render the scene.
|
|
|

| NOTE The Translucency
parameter affects only shadow mapping and light distribution. It does
not cause the surface to become semi-transparent.
|
Applying Maps
to a Raytrace Material
You can apply maps to all of the basic and extended parameters mentioned
previously, including Ambient. In addition, the Maps rollout (see Figure
9.6) allows you to apply a displacement map to your material. Displacement
mapping alters the geometry of the object to which it is applied according
to the grayscale values of a bitmap or a procedural map (this is demonstrated
in Figure 9.7). Dark values on the map indent the surface; light values
raise it in relief. Compare this to bump mapping, in which surface texture
is simulated by shading, but surface geometry remains unchanged.
To displace anything other than an editable mesh or NURBS surface, you
must first apply a Displace Approximation modifier to the object to make
the surface displaceable. Displace Approximation works with any surface
that can be converted to an editable mesh. Once the surface has been prepared,
you simply apply the Raytrace material with the displacement map. The
degree of displacement of the surface is controlled by the Amount spinner
in the Maps rollout.
Be forewarned that displacement mapping creates a high overhead in terms
of geometry. If you can get by with bump mapping, that will save you a
lot of time; but if you truly need to displace a surface, this is a quick
and efficient way to model details.
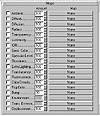
FIGURE
9.6 You can apply many maps to your Raytrace
material’s parameters.
Figure
9.7 Displacement mapping (left) alters geometric
structure. Compare this to the bump-mapped shadows that simulate geometry
(right).
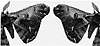
Setting Raytracer
Controls
Raytracer controls govern how the raytrace engine renders materials (see
Table 9.3 and Figure 9.8). You can, and should, optimize performance by
turning off unnecessary reflections or refractions, and by excluding objects.
For greater accuracy you can increase the number of iterations, or “recursion
depth,” that the raytracer performs. Additional controls include
settings for anti-aliasing, blurring, and falloff.
FIGURE
9.8 The Raytracer Controls rollout controls
the raytrace rendering engine.
Table 9.3: RAYTRACER CONTROLS
| Control
| Function
|
| Raytrace Reflections
| Turns raytracing of reflective objects
on or off
|
| Raytrace Refractions
| Turns raytracing of transparent objects
on or off
|
| Reflect Falloff
| Dims reflections to black at this distance
(default is 100.0)
|
| Refract Falloff
| Dims refractions to black at this distance
|
| Bump Map Effect
| Adjusts the effect of bump maps on raytraced
reflections and refractions
|
| Raytraced Reflection and Refraction Antialiaser
| Allows you to blur or defocus (similar
to depth-of-field blurring) raytraced effects using lengthier computations.
When you enable Global Antialiasing in the Options dialog box, these
settings become available in the Ray Antialiasing drop-down list.
|
| Options
| Turns raytracing of various phenomena
on or off at the global level (affecting all raytraced materials)
or the local level (affecting just the current material)
|
| Global Parameters
| Controls the level of recursion and rendering
acceleration; also allows you to set the method of global anti-aliasing.
|
| Local Exclude
| Excludes objects from being rendered by
the current Raytrace material
|
| Global Exclude
| Excludes objects from being rendered by
any Raytrace material
|
© 2000, Frol (selection,
edition, publication)
|
|
)
)
)
)
)
)
)
)
)