| |
Flying Flyouts
So how do you make a toolbar fly? Go to the toolbox now, click on the
Fill tool, and hold for a moment. As expected, the Fill flyout emerges.
But study it closely and you’ll see that it, too, like the toolbox,
has its own region. Pull the flyout away and, you guessed it, it becomes
its own little toolbar.
All toolbars behave the same way, so you can float this Fill flyout-turned-toolbar
anywhere on your screen, or dock it to one side of the application. Guess
what—the Texture Fill dialog can now be one click away instead of
two, and it can also be much closer to your cursor and the objects in
your drawing. Those two qualities are the enduring virtues of floating
toolbars. Icons that used to require two clicks can now be reached in
one; icons that used to reside on the edge of the window can now be placed
right next to your objects.
In Figure 34.3, we are using two windows: one to view leaves for shading
and coloring purposes, and another to zoom in on one of the leaves for
a bit of node-editing work. Each window has the appropriate flyout close
at hand. You can save a lot of time and mouse effort by keeping the essential
tools nearby.
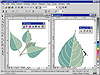
FIGURE
34.3 The toolbars can be positioned right where
the action is in the window on the right. No excess mousing required.
DRAW ships with five additional toolbars that are not on screen by default.
As we mentioned earlier, they can be displayed by right-clicking a toolbar
and checking off the one you want to see.
|
Repairing DRAW’s Zoom Services
The current DRAW interface has been a work of refinement in progress,
but we think that Corel is still struggling to get DRAW’s Zoom
tools right. By definition, tools are persistent—they stay
on screen until you close them. But nobody wants a persistent zooming
tool; you want to zoom once and then do something else. We contend,
therefore, that there is little to be gained by having a floating
Zoom toolbar.
Furthermore, the Zoom tool in the toolbox does not function as
it did in earlier releases. Now its flyout offers only the marquee
zoom and the seldom-used Panning tool, and when you click on either
one, the tool stays active until you change to another tool. This
is especially aggravating when you have just marquee-zoomed and,
expecting to be once again working with the Pick tool, you go to
select an object...only to be surprised by zooming in on it even
further.
Further confusing matters is the curious fact that no less than
five zooming controls are available to you. Oy vey...read
’em and weep:
- • You can click on the Zoom tool in the
toolbox and tear it off to get a little toolbar of just those
two tools.
- • You can right-click the Zoom tool,
select Properties, and check Use Traditional Zoom Flyout to return
the Zoom function to the way it was back in version 5 and earlier.
- • You can right-click on the Standard
toolbar and choose Zoom to get a toolbar that consists of all
zooming commands.
- • When you click the Zoom tool in the
toolbox, the property bar offers the same set of zoom commands.
- • With Tools Ø
View Manager, you can turn on a full-featured dockable tool for
saving and retrieving zoom states in your drawing.
Here are our recommendations. First off, avoid the Zoom tool in
the toolbox altogether—whether floating or docked. Unless you
change its operation, via Properties on its pop-up menu, it doesn’t
function the way it used to, or the way that most users want it
to. Just ignore it.
Second, as we mentioned way back in Chapter 3, the best way to
zoom continues to be with your hotkeys:
- • F2 for marquee-zoom
- • F3 for zoom out
- • F4 for zoom to all objects
- • Shift+F2 for zoom to selected objects
- • Shift+F4 for zoom to page
Pressing F2 to marquee-zoom is not like clicking on the Zoom tool,
and you don’t have the problem of it not going away after use.
But if you have grown accustomed to using the icons for zooming,
we suggest that you activate the Zoom toolbar and dock it below
the toolbox. Even with just an SVGA display, there will be enough
room for all of the important tools to fit.
Now you have a set of zoom controls that are much better than the
defaults—better because you can reach all of them with just
one click instead of two and because they go away after each use.
|
You Say Tomato...
It is impossible to please everyone all of the time, and Corel knows
it. Its program designers have created a default interface that they think
will please most of the people most of the time. They have thought through
which commands and functions should always be available (they would go
on the Standard toolbar), and which ones are only needed in certain contexts
(in which case, they would belong on a property bar). In these efforts,
they have probably succeeded in finding a good middle ground.
But that doesn’t mean you have to be satisfied with it, because
you can make it perfect. All it takes is a bit of customization know-how
and a long interview with yourself. For instance, the on-screen Nudge
setting is a wonderful addition to the property bar, saving us countless
trips to Options when we want to change it from 1 point to 1 pica, or
from 1 point to 1/4 of a point. (We’re pointing to it in Figure 34.4.)
We love it.
We also hate it. Corel placed it on the so-called “No Selection”
property bar—the one that you first see when you start the program,
the one that is active when no objects in the drawing are selected. But
that’s not when we want to change a Nudge setting; we want to change
it after selecting an object and getting ready to nudge. But the property
bar for selected objects is different and it does not include the Nudge
setting. This requires that we deselect the object, change the Nudge,
and then reselect. No good!
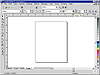
FIGURE
34.4 Great tool, lousy home. We think the Nudge
Offset value box deserves a permanent place on the interface.
We want this great little Nudge adjuster to always be present.
We want it to be visible when we have one object selected, multiple objects
selected, a group selected, a bitmap selected. Any time, any place. That
means just one thing: Standard toolbar, not a property bar. While some
of the maneuvers in this chapter are advanced, this one isn’t. Watch:
- 1. Press and continue to hold Alt until we tell
you to stop. By holding Alt, all toolbars become “unlocked”
and their elements free to be moved.
- 2. Place your cursor inside the Nudge box and begin
dragging it up.
- 3. Find a place on the Standard toolbar where you
would like its new home to be, like, say, next to the Zoom Levels drop-down
list.
- 4. Release Alt and note that Nudge has left its
spot on the property bar and taken up residence on the Standard toolbar.
|
|
|

| TIP To copy an interface
element, hold Ctrl during the above operation. To remove an element
altogether, drag it away from any toolbar (like to the middle of the
page) and release Alt.
|
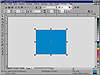
Now we’re happy. Our Nudge box will always be available, no matter
the context, because it now lives on the Standard toolbar, as shown below.
|
|
)
)
)
)
)