| ISO 9000 | ISO 14000 |
GMP Consulting |
Chapter 9
|
||||||||||||||||||||||||||||||||||||||||||
| • The purpose of the paragraph | 216 |
|
| |
| • Navigating your way | 221 |
|
| |
| • Choosing between artistic and paragraph text | 226 |
|
| |
| • Remember the hotkeys | 228 |
|
| |
| • Importing text | 228 |
|
| |
It has been one of computing life’s little secrets. Up until DRAW 7, many DRAW users remained oblivious to “that other way to create text.” Paragraph text has gradually, with each new version, become a legitimate tool for text-intensive projects. Many users of earlier versions were accustomed to creating art in DRAW and assembling the pieces of a brochure or an advertising layout in PageMaker or some other page-layout program. Now they do the whole thing in DRAW, thanks to the program’s beefed-up support for setting, formatting, and editing large blocks of copy.
You create paragraph text inside a text frame, instead of directly on the page as you do artistic text. This distinction is clearer since DRAW 7, because the most direct way to create paragraph text is to drag the Text tool to create the frame before you begin to type.
The distinction is important because paragraph text has a different personality. Paragraph text uses word wrap, like the documents you create in your word processor, to create text that flows freely from one line to the next. The shape of the text flow is determined by the frame you establish when you first create it; the frame can be reshaped later and the text will flow to the new shape. Figure 9.1 shows renditions of the same paragraph of text, each one shaped differently.
)
FIGURE
9.1 Dragging the selection handles of paragraph
text affects the flow, not the size, of the text.
|
| |
| TIP If you want to size your paragraph text with its frame, press and hold Alt as you drag one of the corner handles of the frame. But notice that line spacing will adjust when you do this only if it is set as a percentage of type size. | |
The Purpose of the Paragraph
One of the chief limitations of paragraph text is its indifference to most of DRAW’s special effects. You cannot distort, skew, extrude, or do any of the other gee-whiz things to paragraph text. In reality, though, this is more of a safety measure than a flaw, because if you are trying to apply a special effect to a frame of text, one of two things is probably taking place:
- • You are using a small amount of copy, so
you could easily convert it to artistic text and then apply the effect.
- • You are trying to apply a special effect to too large a block of copy, the results of which would probably be an aesthetic disaster.
The purpose of paragraph text is to allow you to set a lot of copy, not to create lots of artistic text. To this end, you’ll find a treasure of features hidden within paragraph text, as described in the paragraphs that follow.
Better Redraw and Bigger Capacity
Paragraph text is much faster on the redraw than artistic text. When you change typeface, style, or size, paragraph text adjusts almost instantaneously, while artistic text may take a bit longer, especially if the string is long or effects have been applied to it.
While the capacity of both types of text has been greatly increased over the years, you will run into problems if you try to set huge blocks of copy in artistic text. However, there are no practical limits on the amount of text you can set with DRAW’s paragraph text.
Better Text Control
Paragraph text offers the kinds of controls you would expect to find in a program that supports large quantities of text. You can set tabs and indents; create left and right margins; set space above and below a paragraph and between the lines of a paragraph; set up columns and adjust frame width; and specify bullet characters or drop caps at the beginning of paragraphs.
All of this is done through the Format Text dialog, the various pages of which are shown in Figure 9.2. With the text box selected, go to Text Ø Format Text. Alternately, you can use the hotkey Ctrl+T, the property bar, or the Properties sheet that you can invoke by right-clicking on a frame of text.
Basic text-formatting functions are also available on the property bar; the range of such functions is greatest when working with the Text tool.
- The Font page The Font page of the Format Text dialog is essentially
identical to the artistic text version discussed in Chapter 8. The only
difference is that the Range Kerning control is not available for paragraph
text, unless you first highlight a portion of the text. You can still
adjust the spacing of individual characters, however, with the Shape
tool, or on the Space page of the dialog.
- The Align page Alignment controls and hyphenation are here. The Character Shift controls at the bottom-right of the page allow you to move or rotate selected characters. The Indent controls are like those of most word processors. Figure 9.3 shows three of the most common Indent settings, along with their results. As with artistic text, if you want to do this with multiple noncontiguous characters, you are better off using the Shape tool and its property bar controls.
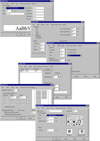
FIGURE 9.2 The many faces of Format Text when used with paragraph text.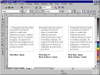
FIGURE 9.3 Controlling margins and indents is easy with paragraph text.- The Space page This page provides controls for space between characters, words, and lines within a paragraph (leading). You can also designate space above and below paragraphs (remember, you can have many paragraphs within one frame of text).
- The Align page Alignment controls and hyphenation are here. The Character Shift controls at the bottom-right of the page allow you to move or rotate selected characters. The Indent controls are like those of most word processors. Figure 9.3 shows three of the most common Indent settings, along with their results. As with artistic text, if you want to do this with multiple noncontiguous characters, you are better off using the Shape tool and its property bar controls.
)
)
)
)
)
|
| |
| TIP Remember that you can insert line breaks into paragraphs—hard returns that do not signify the end of the paragraph. Unlike paragraph breaks, DRAW does not add any space above or below a line break. It simply drops down to the next line without waiting for the text to wrap at the end. You can insert these line breaks with Shift+Enter. | |
- The Tabs page Tab controls work like every other tab function
known to computing-kind. Leadered tabs can be set, using any character
of any typeface you have installed. (Go easy on leadered smiley faces
though, okay?)
- The Frames and Columns page The controls on this page of the Format Text dialog allow you to specify how many columns you want within the current frame, how wide they should be, and how much space should be left between columns. You can tell DRAW to fit the columns into the existing frame width or to adjust the frame to fit the column widths you want.
The Frames and Columns page is also the home of Vertical Justification of text. The default setting is Top, which is what you are used to: the text begins at the top of the frame, uses the line spacing you specify, and ends wherever you run out of things to say. The other possibilities are Center, Bottom, and Full—the latter adjusting the line spacing automatically to fill the frame.- The Effects page This set of controls enables you to precede any paragraph with a bullet or a drop cap. Any typeface that is identified as a “symbol” face (a property given to a typeface by its developer) will show up here in the font list when Bullet is the Effect Type. This means you can go way beyond the bounds of good taste when setting bullets, as clearly demonstrated by Figure 9.4.
- The Frames and Columns page The controls on this page of the Format Text dialog allow you to specify how many columns you want within the current frame, how wide they should be, and how much space should be left between columns. You can tell DRAW to fit the columns into the existing frame width or to adjust the frame to fit the column widths you want.
)
FIGURE
9.4 There could come a time when a smiley face
would be suitable as a bullet character. Then again, maybe not.
)
|
| |
| WARNING Despite the ease of creating a drop cap, there’s something else you should watch for. If you add a drop cap to a carefully sized text frame, it may take up more room than is available. When the middle selection handle below the frame turns into a downward-pointing arrow, DRAW is telling you that the text no longer fits in its entirety. Fixing it is easy—just extend the frame—but missing it is also all-too-easy, so keep an eye out for it. | |
| Previous | Table of Contents | Next |
|
|